The SCC portal, by default, offers the option for end-users to submit requests. End-users who submit requests can also manage their support requests in the customer portal.
The SCC portal also offers the option to submit support requests.
- Creating an account
- Brief overview of the portal after you sign-in
- Submitting a support request
- Tracking your support requests
- Tracking your organization's support requests
- Updating a support request in My Activities with a comment, CC, or organization
- Updating a support request by email
- Marking a request as solved
- Creating a follow-up to a solved request
====================================================================
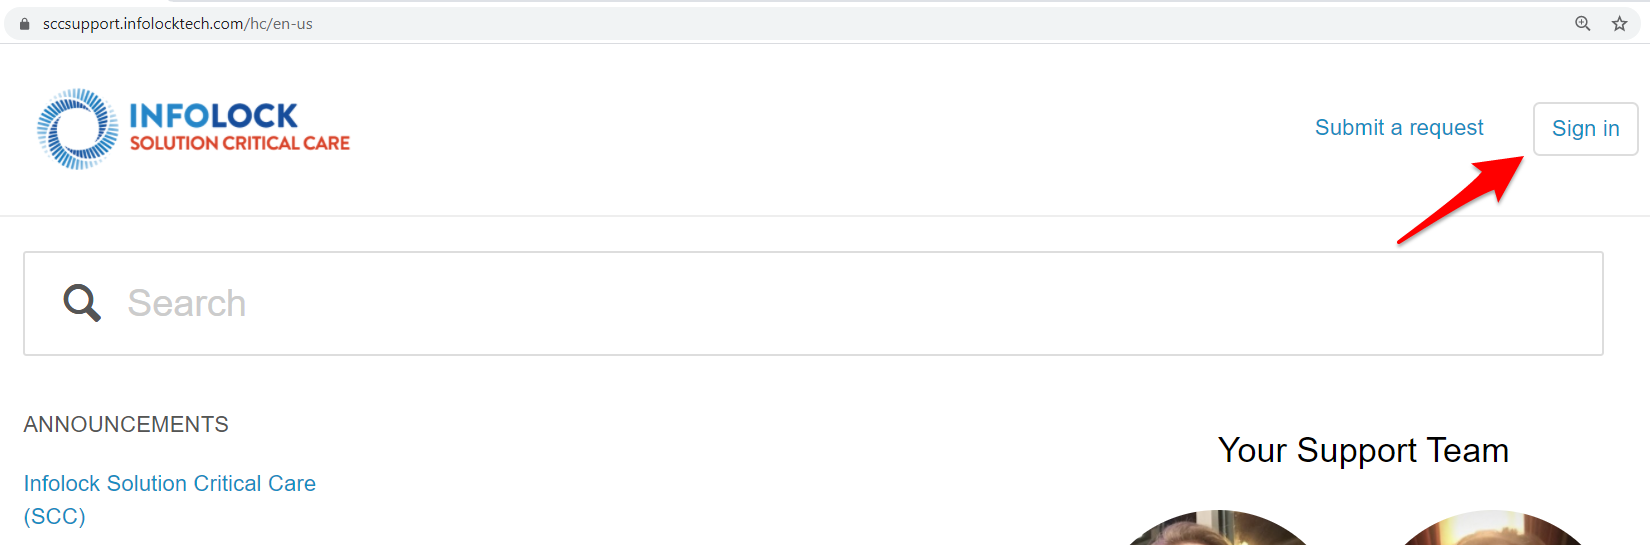
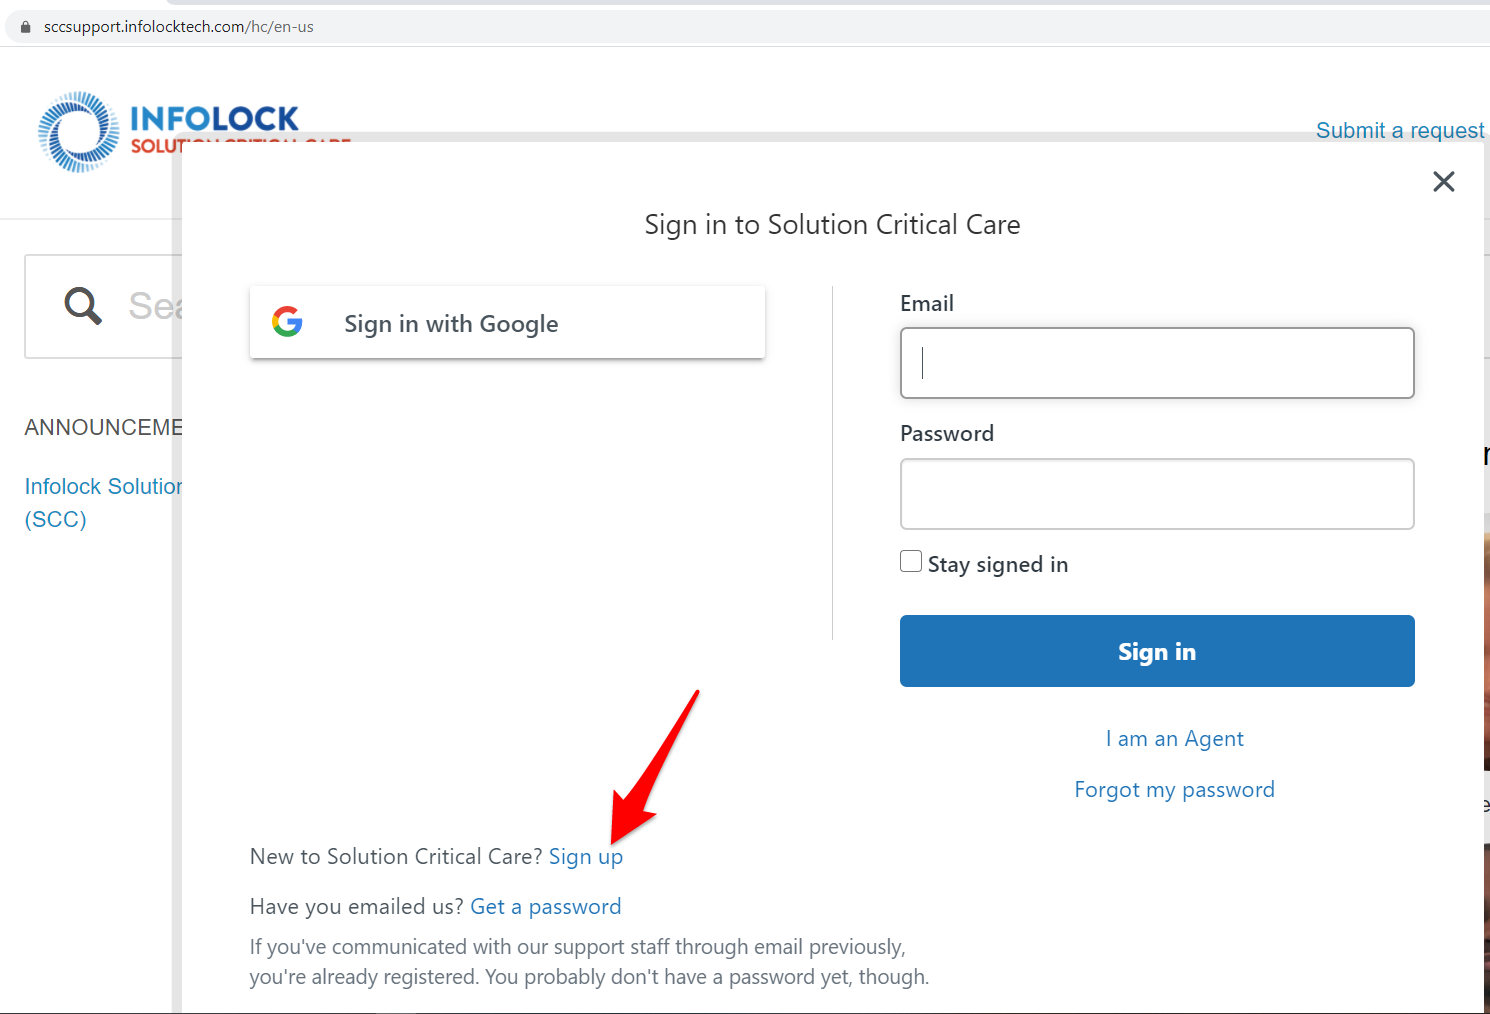
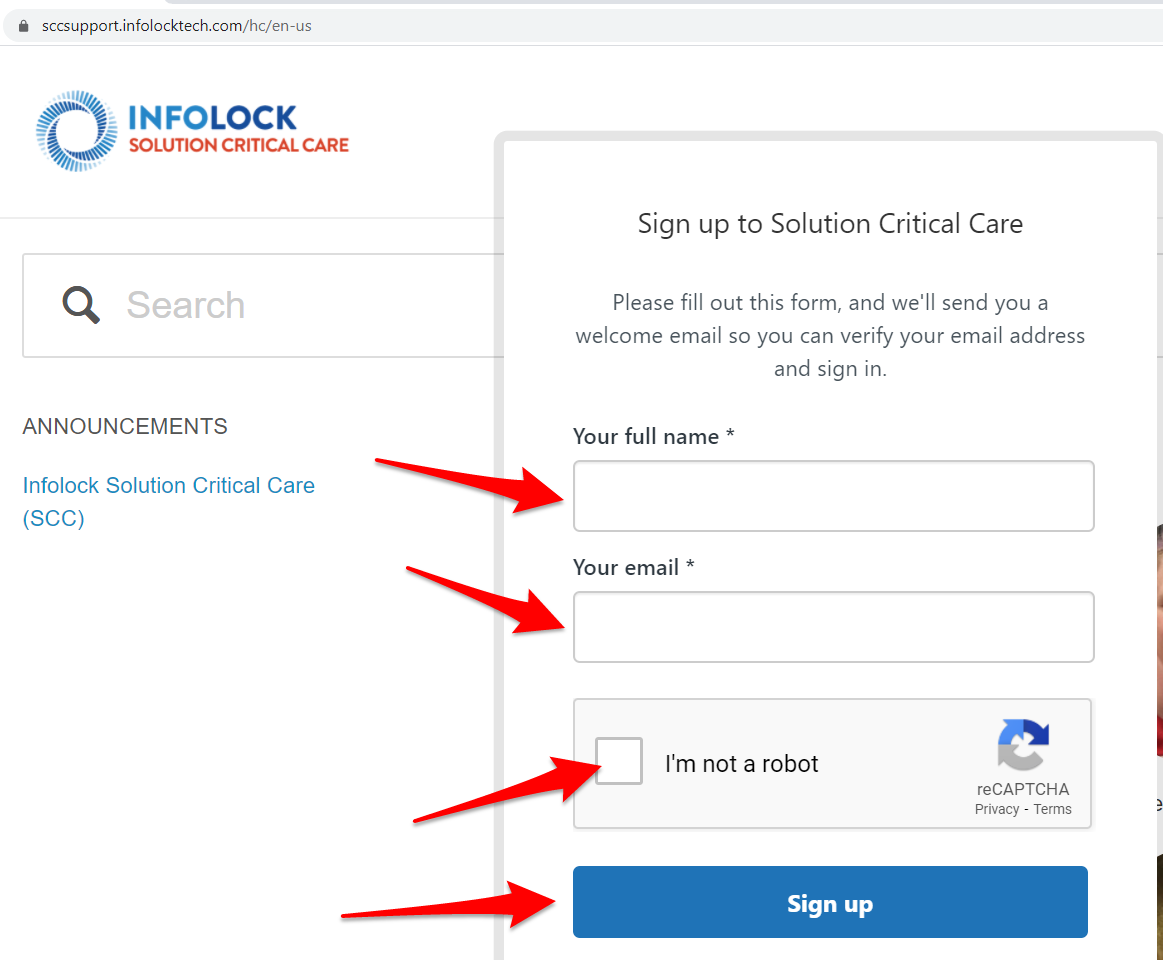
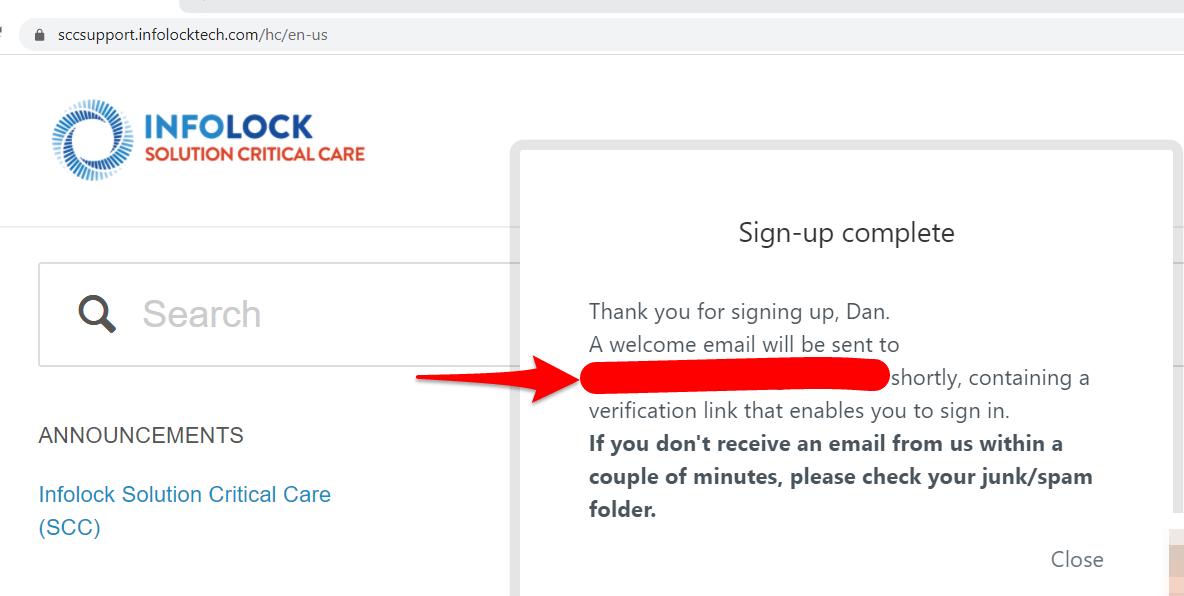
Creating an account:
1. Click on "Sign In"
2. Click on "Sign Up"
3. Complete the form by providing your "Full name" and "Email" address, don't forget to also complete the CAPTCHA. Lastly, click "Sign Up" to complete the process.
4. After completing the form and signing up you will see the below message.
"Thank you for signing up, <YOUR NAME>.
A welcome email will be sent to <YOUR EMAIL ADDRESS> shortly, containing a verification link that enables you to sign-in.
If you don't receive an email from us within a couple of minutes, please check your junk/spam folder."
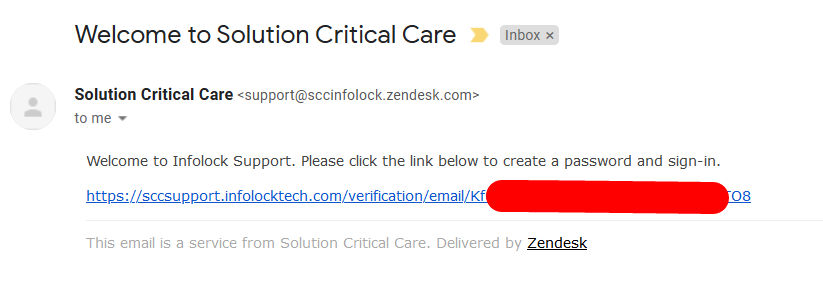
6. Check your email inbox for verification email link and click it to complete verification and to setup your password.
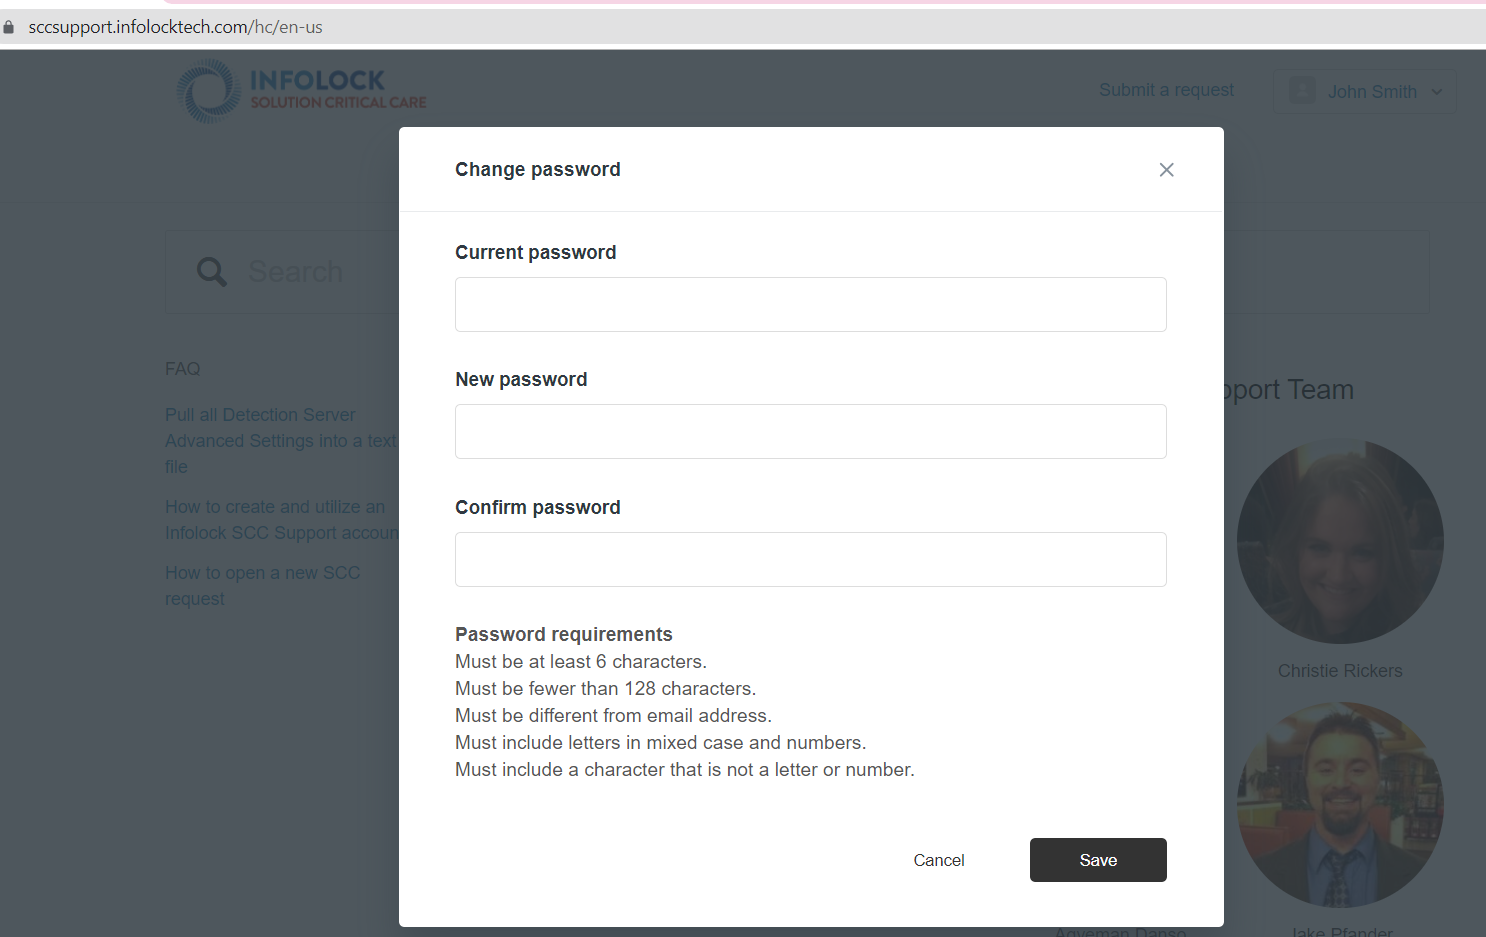
**Password requirements:
must be at least 6 characters
must be different from email address
must include letters in mixed case and numbers
must include a character that is not a letter or number
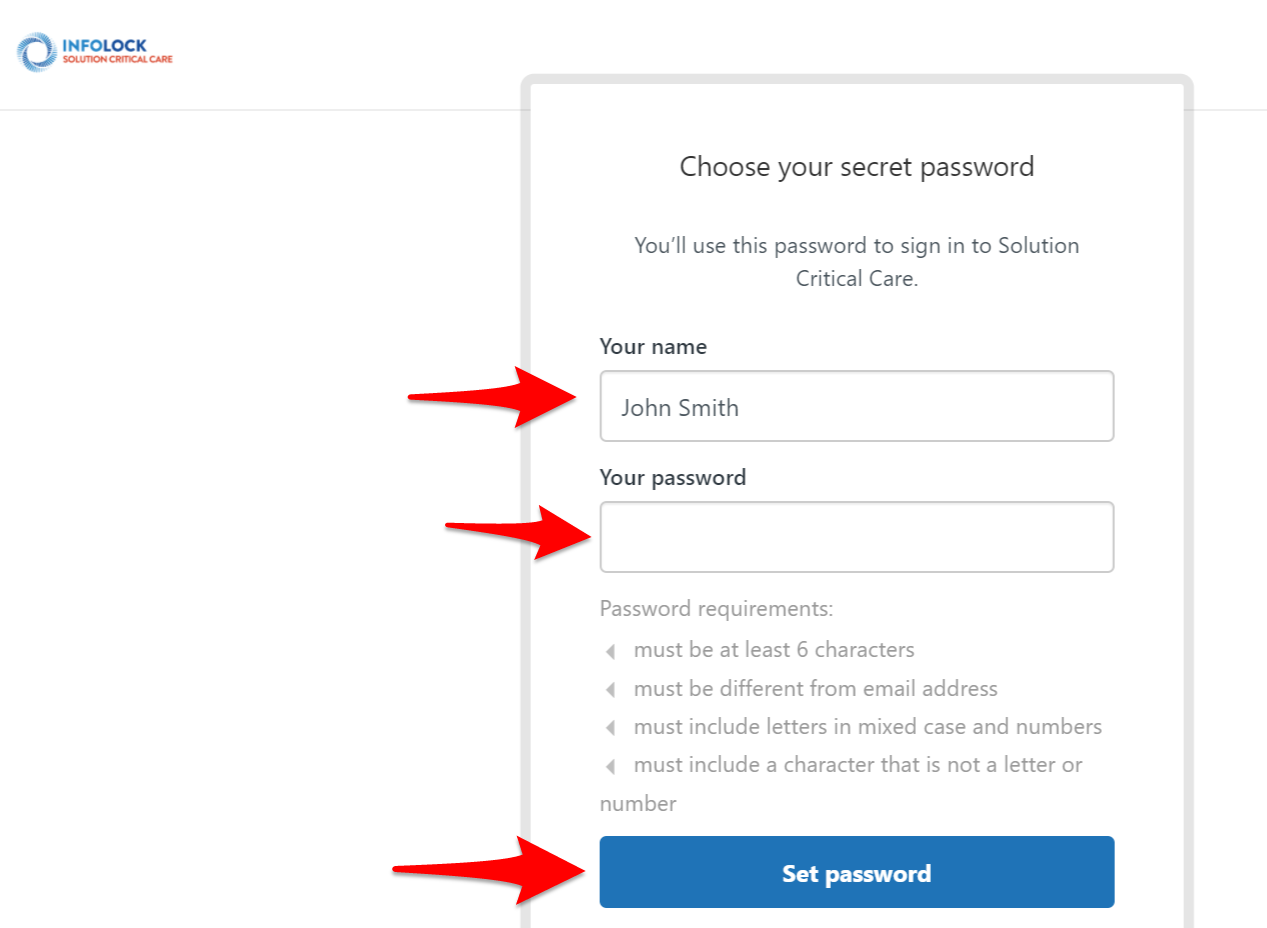
7. Congratulations you have completed Sign Up and are now logged into the portal.
====================================================================
Brief overview of the portal after you sign-in:
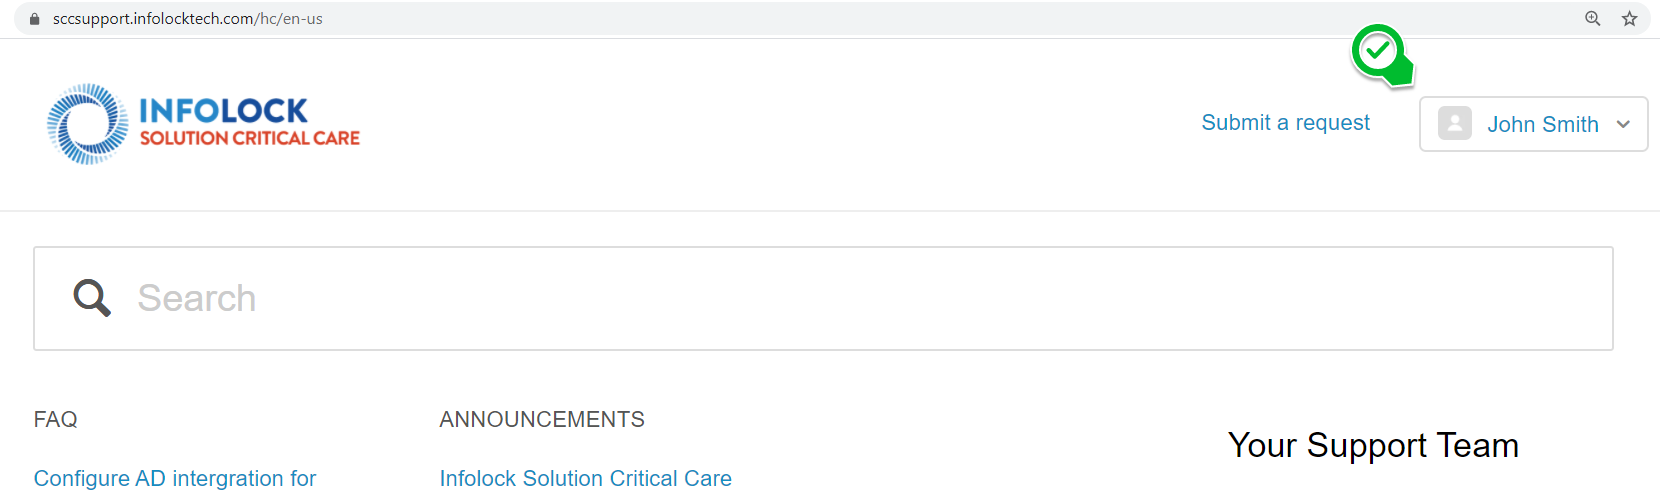
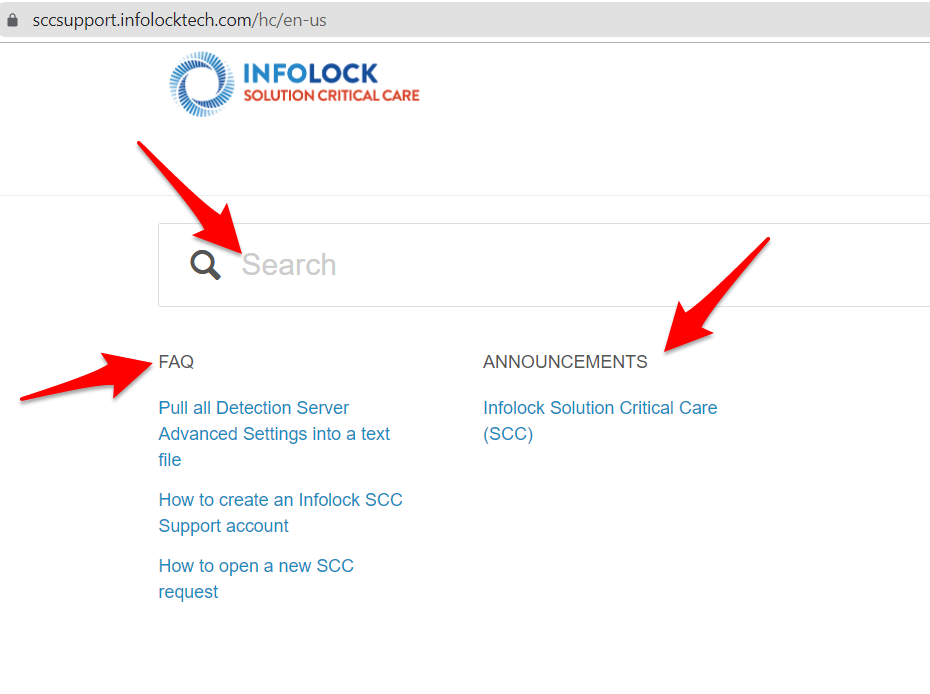
1. After sign in, you will be able to view "Announcements" and articles such as "FAQ" and more. You can also use the Search bar to search for articles directly. Please note that at this time there is only a limited number of articles.
2. View your activity by selecting "My activities"
Here you can view
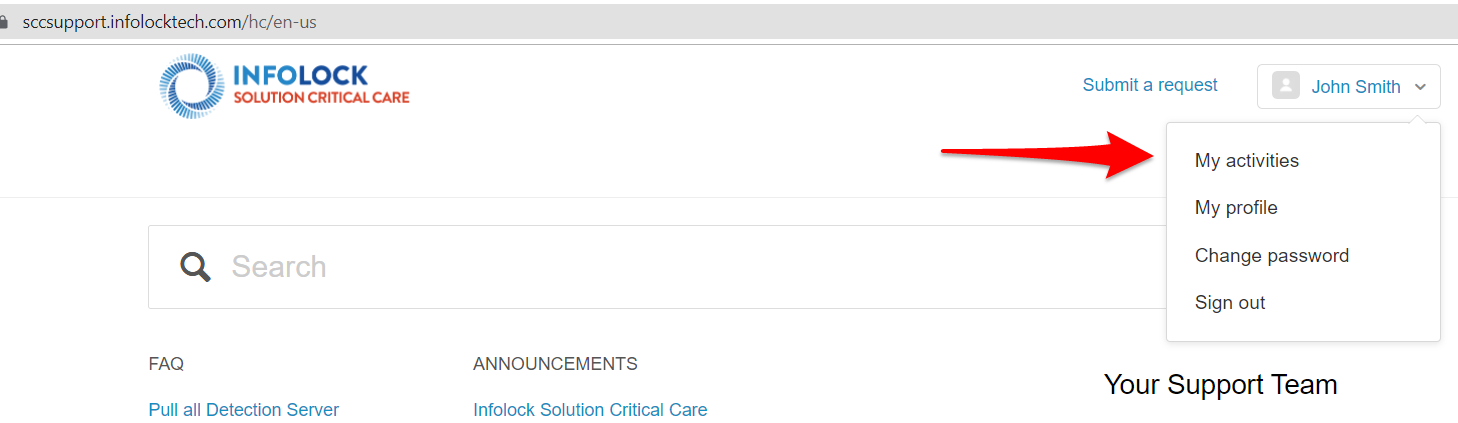
- You can view your activities such as active or solved requests requests, requests you are CC'd on, and your organization's requests.
- You can also view "Contributions". The Contributions page shows articles you have left comments on.
- You can also view "Following". The Following page shows articles you may be following.
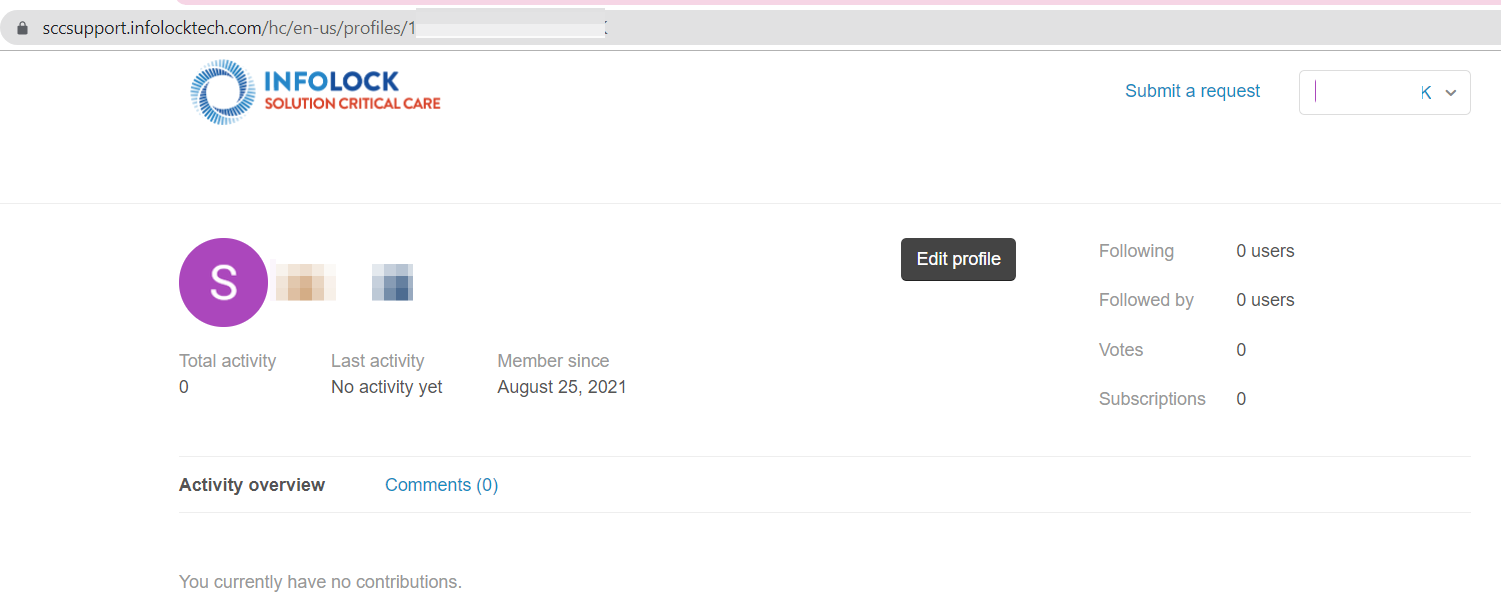
3. View your profile by selecting "My profile".
You can view and edit your profile on the "My profile" page, and view high level statistics on your activity.
4. To update/change your password select "Change password". Alternatively you can request to send you a change password email.
====================================================================
Submitting a support request:
You can use the help center to track your support requests. New Request Creation
- Customer opens request via:
A. VIA THIS SUPPORT PORTAL - logs in to Support Portal: https://sccsupport.infolocktech.com/
- Click "Submit a request"
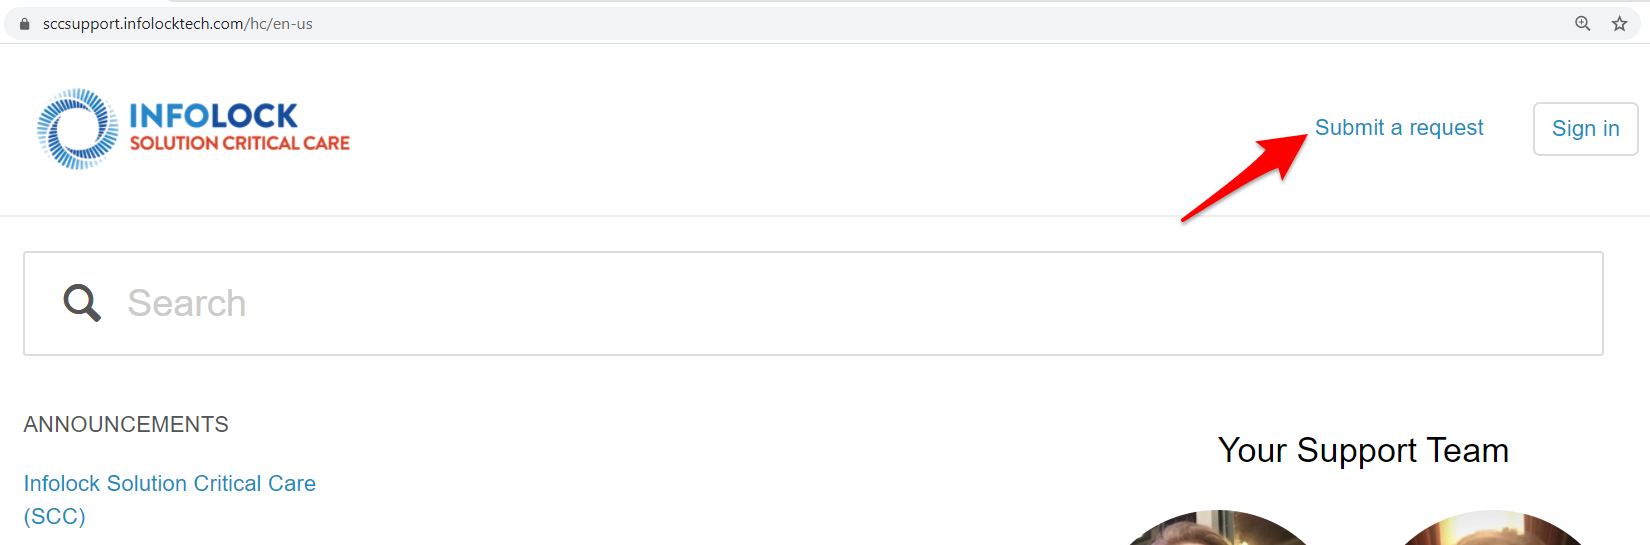
- Complete the form making sure to include all required fields:
Note: High severity cases (Sev 1 and Sev 2) are considered system down or unusable. Pleaes open ticket with vendor support before reaching out to SCC.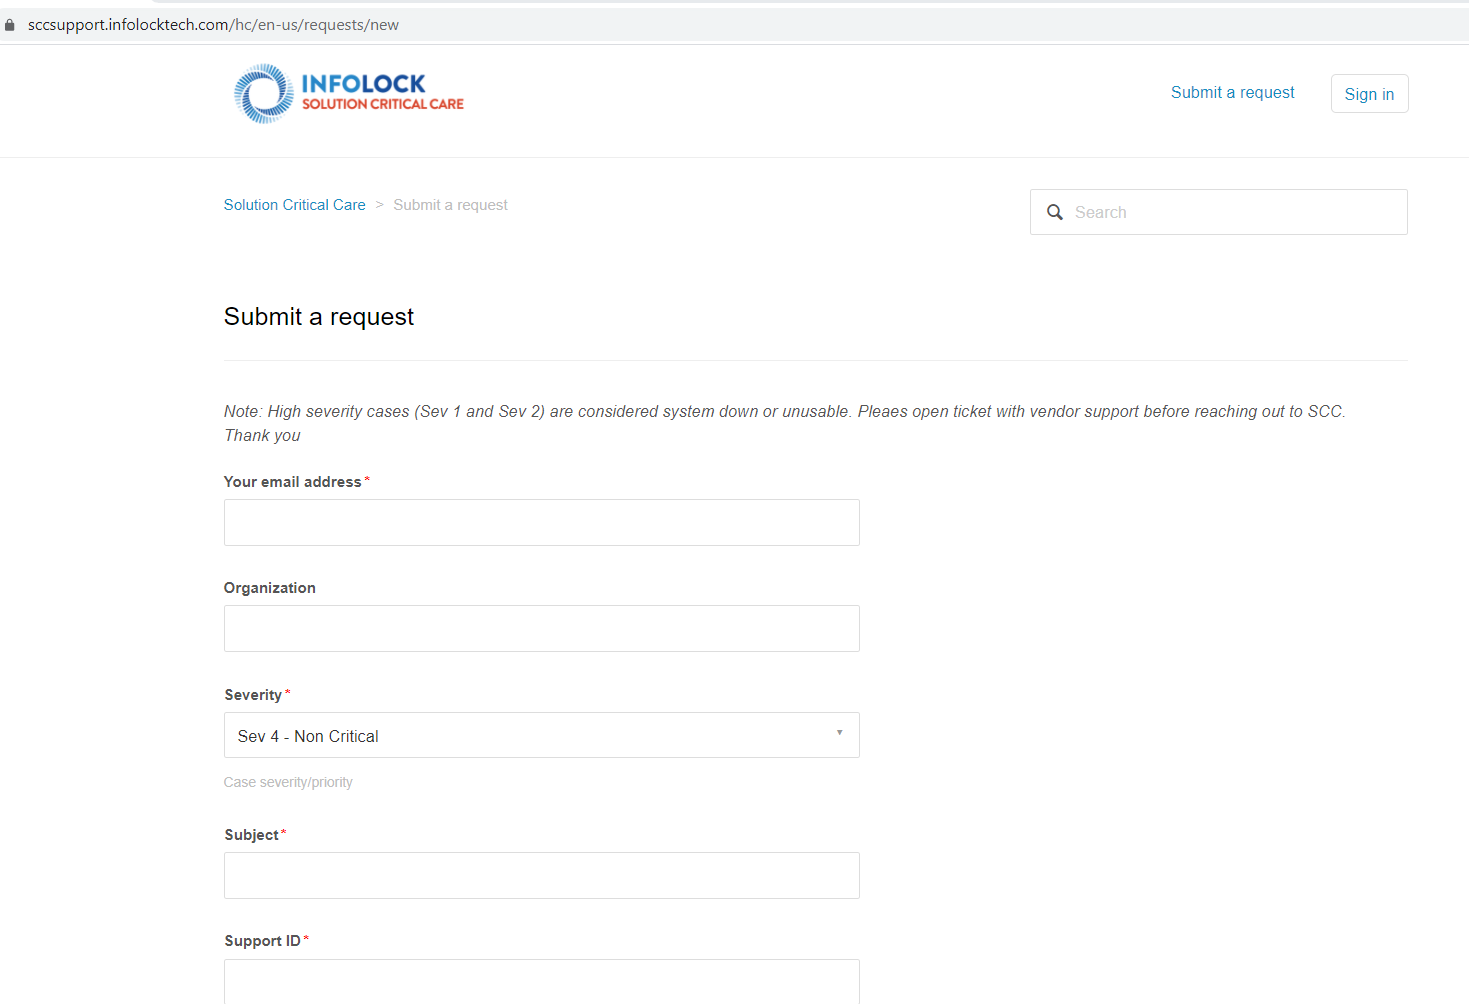
B. VIA EMAIL
- Send an email to sccsupport@infolocktech.com
====================================================================
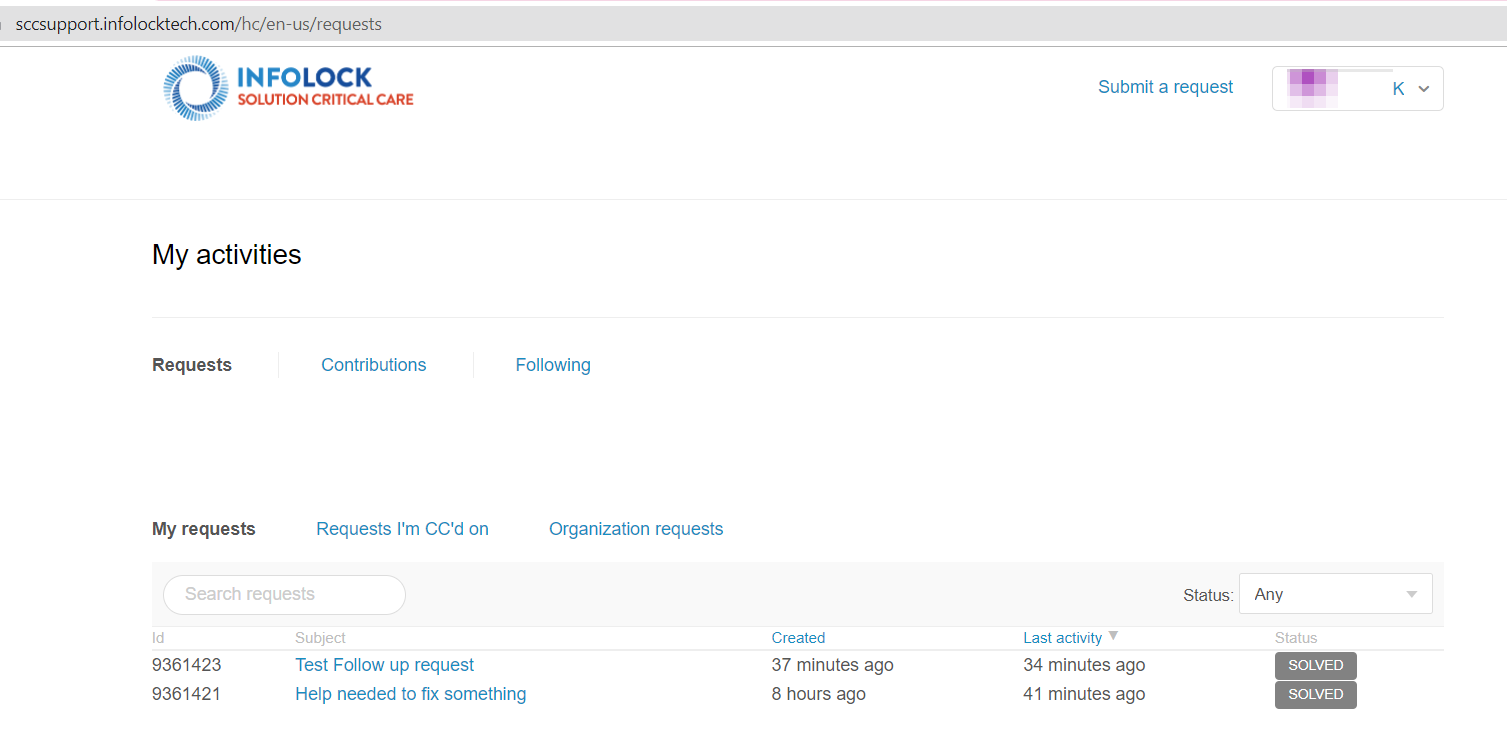
Tracking your support requests
You can use the SCC portal to track your support requests.
To track your support requests
- Click your profile icon on the upper-right side of any help center page, and then click My activities.
By default, the page displays all requests that you have submitted.

- To filter your requests by status, select a request status from the Status menu.
- Open is a ticket that's been assigned to an agent who is working to resolve it.
- Awaiting your reply is a ticket that's been assigned to an agent, but the agent is waiting for more information from you before resolving the ticket.
- Solved is displayed when work on the ticket is complete.
- To search your requests, enter a search term in the Search Requests box.
- To see details about a request, click the request title.
====================================================================
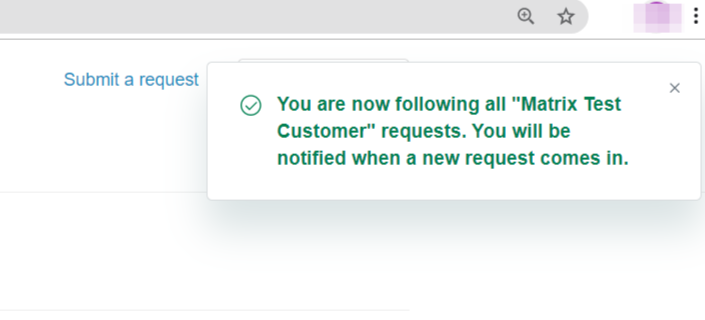
Tracking your organization's support requests
As an end-user of an organization, you can see tickets for all members of that organization.
To track your organization's support requests
- Click your profile icon on the upper-right side of any page, and then click My activities.
- Click the Organization Requests link on the My Activities page to see all the requests in your organizations.

- To see details about a request, click the request title. You can add comments to a request.
- Click your profile icon on the upper-right side of any page, and then click My activities.
- Click the Organization Requests link on the My Activities page to see all the requests in your organization.
- Click Follow.

You will now receive notifications for new and updated request in your shared organization.
====================================================================
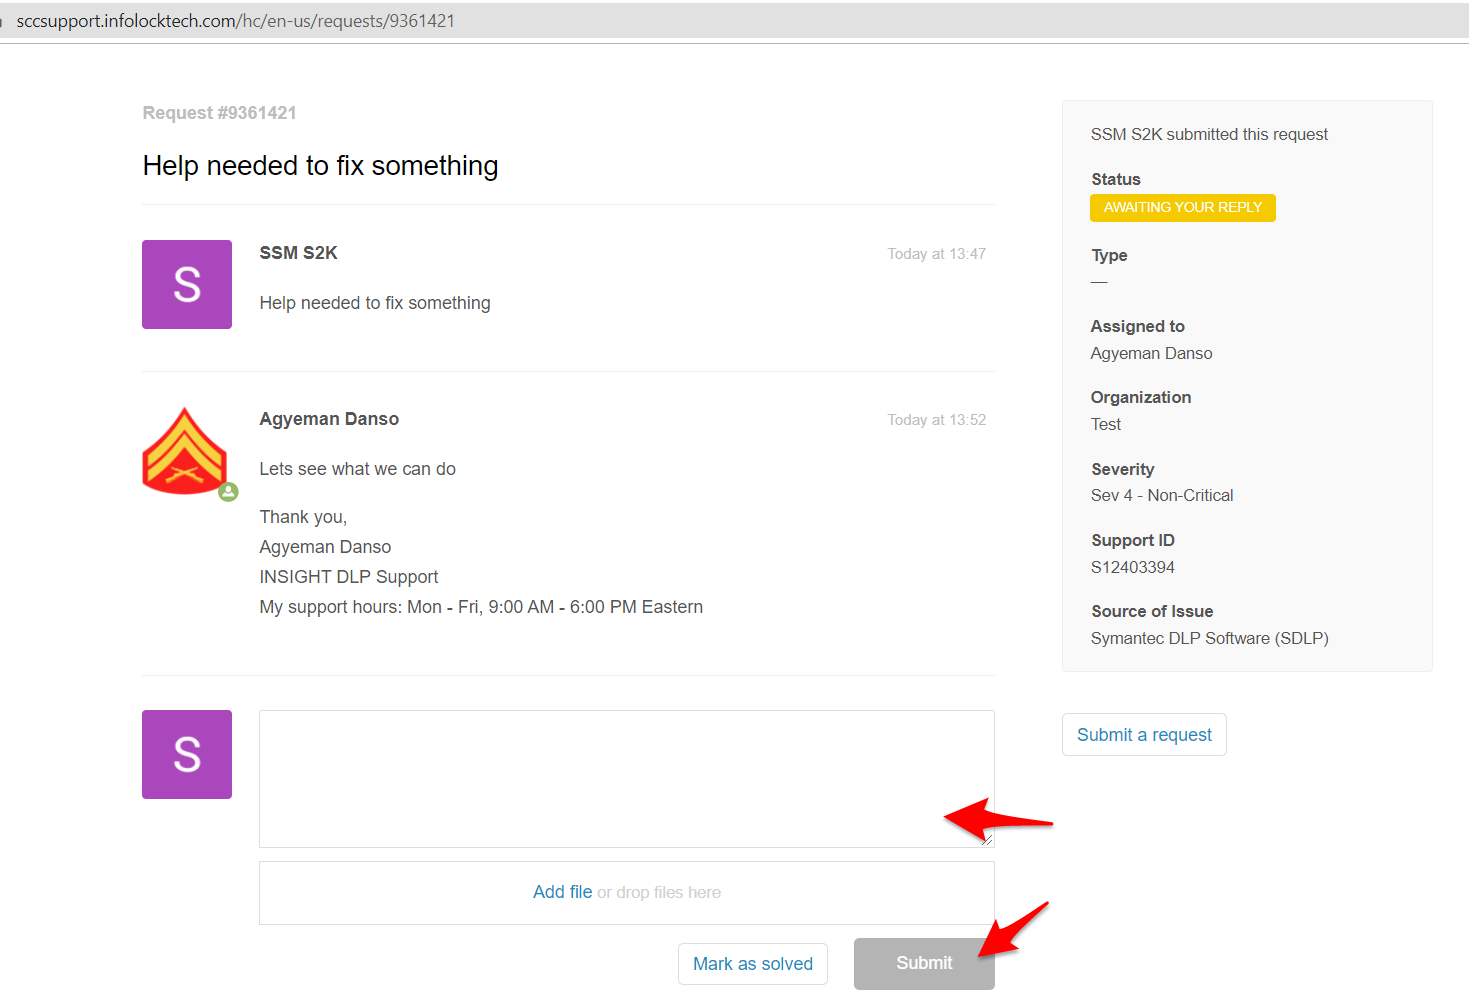
Updating a support request in My Activities with a comment, CC, or organization
You can update any existing support request that is not closed with a comment.
You can also add CCs (if enabled in the help center) to an existing support request. And if you belong to multiple organizations, you can also change the organization for a support request when you view it in the help center.
To update an existing support request
- Click your profile icon on the upper-right side of any help center page, and then click My activities.
By default, the My Activities page displays all requests that you have submitted.
- Click the link for the request you want to update.
- Add a comment to update the request.
- (Optional) If the CC option is enabled for the help center and you are signed in, you can add an email address to copy a user on the ticket
When you add a CC to an existing ticket, you must also add a comment.
- Click Submit.
====================================================================
Updating a support request by email
End-users can update an existing support request ticket with a comment by email.
Your email must reference an existing ticket ID, using the proper syntax, in plain text. You must have permission to update the ticket, either as the ticket requester, a CC on the ticket, or a member of the organization for the ticket.
- In your email client, create a new email message or forward an existing email.
The email is to the support team (sccsupport@infolocktech.com). The subject can be anything you want.
- At the top of body of the email, enter the ticket ID for an existing support request using the following syntax:
#id ticketnumberFor example:
#id 123456 - Leave one blank line after the ticket ID.
- Enter the comment you want to add to the ticket after the blank line.
Your email should look something like this.

- Send the email.
To update an existing support request by email (Option #2)
- In your email client, reply or forward an existing email relating to a case you have previously opened or have been cc'd on
- Enter the comment you want to add to the ticket after the blank line.
Your email should look something like this.
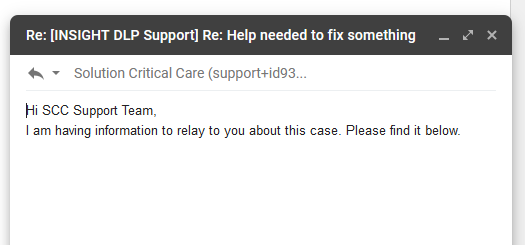
- Send the email.
====================================================================
Marking a request as solved
You can close/withdraw a request by marking it as solved. The request must be assigned to an agent before you can mark it as solved.
To mark a request as solved
- Click your profile icon in the upper-right side of any page, and then click My activities.
- Click the title of an open request to open it.
- Select the option on the lower side of the request to mark it as solved.
The request must be assigned to an agent. Otherwise, you do not have the option to mark it as solved.
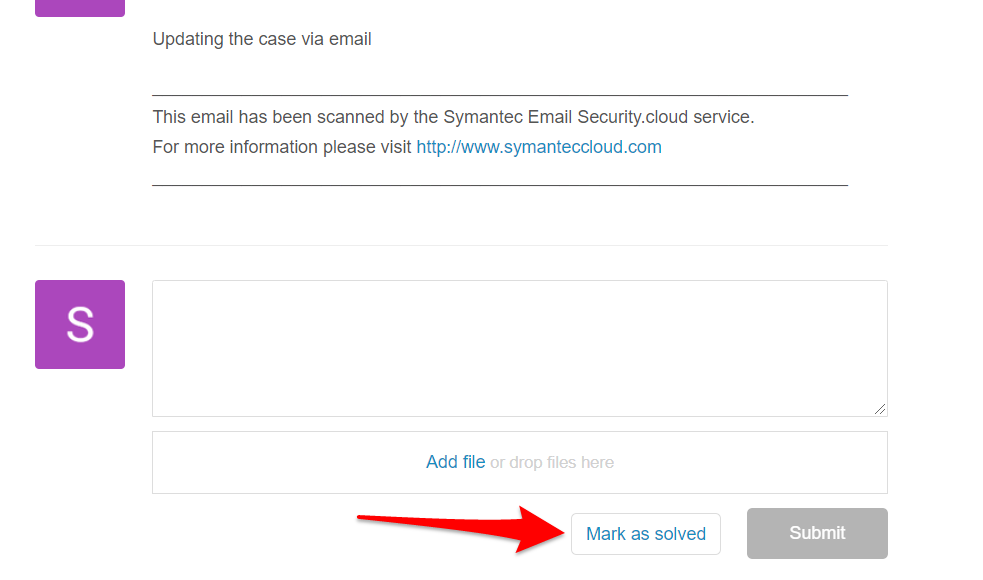
- Enter any comment you want in the reply and click Add Reply.
====================================================================
Creating a follow-up to a solved request
You can reopen a solved request by creating a follow-up ticket.
To create a follow-up to a solved request
- Click your profile icon in the upper-right side of any page, and then click My activities.
- Click My requests in the sidebar.
- Click the title of a solved request to open it.
Tip: If you have a long list of requests, filter the view by selecting Solved from the Status menu.
- Click the link on the lower side of the request to create a follow-up request.
- Complete the follow-up request and click Submit.
====================================================================